


Google rolled out Google Analytics 4 (GA4) in March of 2022 and is planning to sunset Universal Analytics (UA) by July 2023. If you have a Shopify ecommerce website you might be wondering how to move from UA to GA4 – because it’s not very clear. Unlike UA, GA4 does not have its own “settings” area. In this article, I’ll walk you through how to integrate GA4 with your Shopify store and even answer a few additional questions you may have along the way.
To learn more about the benefits of GA4 versus UA, check out our Ultimate Guide to Google Analytics 4.
Why Does my GA4 Code Say gtag.js? Is This Related to Google Tag Manager?
This is a bit confusing. It turns out that gtag.js is the “Google tag,” but is not at all related to Google Tag Manager (GTM) – the platform for managing Google Analytics tags, other Google product tags, and 3rd party tags or pixels. The gtag.js Google tag is the new analytics tag for all Google products (including Google Analytics/GA4). GTM is a manager for this new tag along with other tags or pixels.
According to Google support, “The Google tag (gtag.js) is a single tag that you can add to your website to use a variety of Google products and services. Instead of managing multiple tags for different Google product accounts, you can use the Google tag across your entire website and connect the tag to multiple destinations.”
So if you are using GTM to manage only Google tags/pixels it’s likely you can replace GTM with your new Google tag and receive improved event tracking. Before doing so, however, you should do a deep dive into your GTM setup so you don’t lose any custom events or conversions you currently track.
Should I Use GTM to Add GA4 to My Shopify Site?
I would not recommend using GTM on your Shopify shop unless required, and because of that, this article won’t cover these steps. Ultimately, you can’t properly track checkouts and purchases unless you have a Shopify Plus plan. At the end of this article, I’ve included some additional reasoning and a quick overview of what’s required if you really, really need to use GTM.
Creating a GA4 Property
If you have a GA4 property already, skip to the next section. Otherwise follow one of the two instructions below and stop just before you are instructed to add the tag to the website. Adding the code to your Shopify site will be covered in the next section.
- If you have a UA property setup already: https://support.google.com/analytics/answer/9744165?hl=en#zippy=%2Cin-this-article
- If you don’t have a UA property setup on your site: https://support.google.com/analytics/answer/9304153?hl=en&ref_topic=9303319
Getting GA4 Set Up in Shopify
If you are using UA in Shopify, you likely implemented it by adding your UA-ID to the Google Analytics field in Online Store > Preferences.
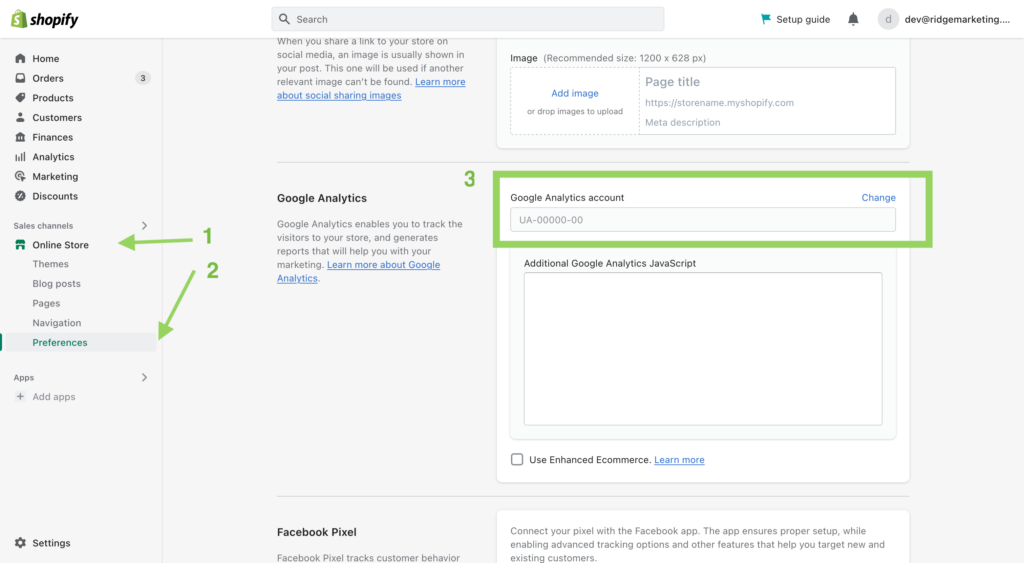
If you already have your UA setup here, you can leave it. Eventually it will stop collecting data, but for now it won’t affect anything when you add GA4 to your Shopify store.
The Google Analytics area in Shopify isn’t made for an easy installation of GA4. Instead, go to Settings (at the bottom of the left sidebar menu) > Customer Events > and click “Add Custom Pixel”.
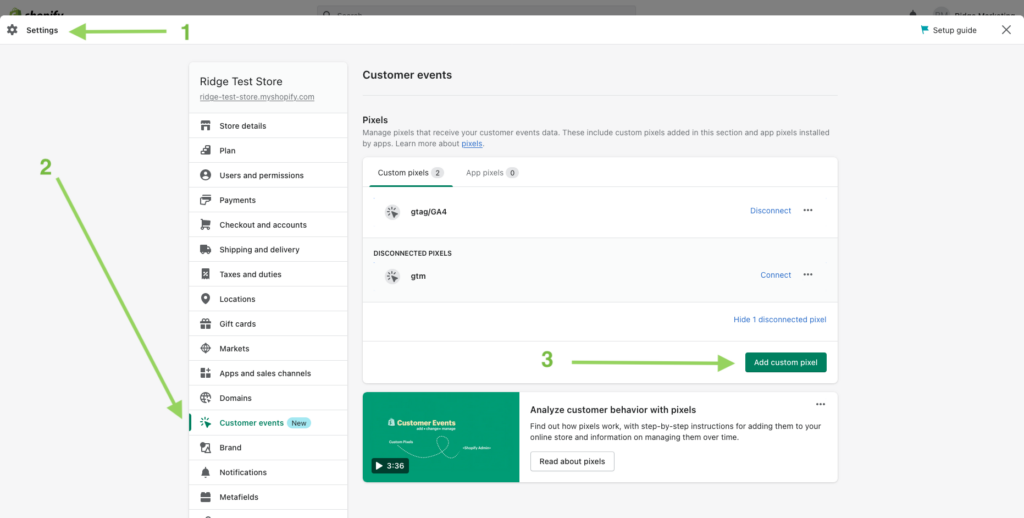
Customer Events is a new area where you can add Javascript to your Shopify store that can receive event data from Shopify’s Customer Events. Here is where you can add the code that initializes the new Google tag and passes Customer Events to your GA4 property.
Grab the code from our github repo: https://github.com/Ridge-Marketing/shopify-ga4-script/blob/main/shopifyGA4.js
You’ll need to replace “your-id-here” with your Google tag’s Measurement ID (“G-” ID). To get your “G-” ID, go to your GA4 property at analytics.google.com > Settings > Data Streams and select the existing stream you made during the “Creating a GA4 Property” step above, copy the “Measurement ID” and paste it inside the quotation marks to replace “your-id-here”.
More detailed instructions on finding your “G-” ID can be found here: https://support.google.com/analytics/answer/9304153?hl=en&ref_topic=9303319#zippy=%2Cfind-your-g–id-for-any-platform-that-accepts-a-g–id
Once you’ve replaced “your-id-here” with the “G-” ID, save the pixel, connect it to your store, and you are all set.
What This Code Does
It’s pretty straightforward. We’ve subscribed to three Shopify Customer Events: Add to Cart (product_added_to_cart), Initiate Checkout (checkout_started), Purchase (checkout_completed), and pushed their events to our GA4 property for tracking.
Caveats
Initiate Checkout fires once
The Add To Cart event fires off every time an item is added to the cart and Purchases fires every time a checkout is completed, but the Initiate Checkout only fires off once until the checkout is either completed or the session is cleared.
Change currency symbol
If you aren’t selling in US dollars, you’ll need to go to the “product_added_to_cart” subscription and change it to whatever currency your store is set to use.
Why Can’t I Just Use Google Tag Manager?
Long story short, Shopify doesn’t have an optimal way to implement GTM if you aren’t paying the hefty monthly price for a Shopify Plus account. Only Shopify Plus members have access to the checkout.liquid template file required to add GTM’s pixel to checkout.
Users without Shopify Plus can use a hack to add an empty UA-ID to the Google Analytics area and plop the GTM head tag into the Javascript area, but you still won’t be able to push Shopify’s Customer Events to GTM’s dataLayer. If you do that, you’ll be stuck with detecting button clicks and page views to track conversion events which, in my opinion, is inferior to using GA4 + Customer Events.
So, unless GTM is something you cannot live without, it’s best to just ditch it altogether and implement your third party pixels (Mixpanel, Hotjar, Kiss Metrics, etc.) individually in the same fashion we enabled and pushed Shopify Customer Events to our GA4 pixel in this article.
Helpful Docs
- How to create the pixel code for use in Customer Events: https://help.shopify.com/en/manual/promoting-marketing/pixels/custom-pixels/code
- Full list of Shopify Customer Events: https://shopify.dev/api/pixels/customer-events#checkout
- List of GA4 events: https://developers.google.com/analytics/devguides/collection/ga4/reference/events?client_type=gtag#begin_checkout
We’re Here to Help
If your business runs a Shopify store and you’d like help integrating it with GA4, reach out to us.